How to Complete a Check-In
Most check-ins take 3-5 minutes when documents are ready. This guide describes the guest check-in experience on AVA's self-service kiosk or assisted check-in device.
This guide helps you understand and support the guest check-in process from reservation lookup to room access. Guests complete check-ins using AVA's check-in kiosk (accessed via QR code or URL) in three modes: self-service (CCI), staff-assisted (ACI), or pre-arrival.
How guests access check-in:
- Scan the QR code displayed at your property
- Visit the check-in URL you provide
- Staff can assist using the assisted check-in (ACI) interface
To manage reservations and room assignments from your staff dashboard, go to the Reservations page (home screen). This guide focuses on the guest-facing check-in experience.
This short video shows the full multi-room check-in journey from the guest perspective.
Quick Reference
| Step | Who completes it | Where it appears |
|---|---|---|
| Reservation Lookup | Guest or staff | Check In, Reservation Lookup, or Staff Access |
| Document Upload | Guest or staff | Guest Verification on each room card |
| Bulk Upload | Staff (for groups) | Upload All Documents button above room cards |
| Guest Information | Guest or staff | Guest Information → Fill |
| Signature | Guest (sometimes all guests) | Signature → Sign |
| Facial Verification | Guest (self check-in only) | Facial Verification → Verify |
| Deposit / Payment | Guest (self check-in only, when enabled) | Reservation Requirements |
| Check-In / Pre-Arrival | Guest or staff | Proceed to Check-In or Complete Pre-Arrival |
| Room Access | Staff or guest | Room Information |
Check-In Modes
| Mode | Best for | What changes |
|---|---|---|
| Pre-Arrival | Guests before arrival | No facial verification. Use Complete Pre-Arrival. Room access is issued on arrival. |
| Self Check-In (CCI) | Guests on kiosk | Facial verification may appear. Deposit or payment can block Proceed to Check-In. |
| Assisted Check-In (ACI) | Staff-led check-in | Staff use Staff Access search. Room access stays hidden until handover. |
This short video shows the full assisted check-in (ACI) flow from the staff perspective.
Before You Start
Confirm these items:
- The reservation is active (not cancelled or no-show)
- The guest has a passport or ID ready
- The room is ready or can be assigned
- Your keycard encoder or smart lock system is online
Step-by-Step Check-In
If Guest Step Auto-Advance is on, AVA opens the next required guest step after you save. If it is off, you must select the next step manually.
1. Find the reservation
-
On the Check In screen, scan the guest's passport or ID
-
If scanning is not available, select Use Confirmation Number Instead
-
Enter the confirmation number and select Continue
✓ You should see the reservation's room cards
Scan lookup only matches arrivals from yesterday and today. Use confirmation number for early or future arrivals.
If you are using Assisted Check-In (ACI)
- On the welcome screen, select Check In
- Open Staff Access
- Search by guest name, reservation ID, or external booking ID
- Select the correct reservation
✓ You will see the room list
Staff Access only shows arrivals from yesterday and today. To find any other date, search by confirmation number.
If the guest completed pre-arrival
Find the reservation by confirmation number, then continue with Proceed to Check-In on arrival.
2. Review rooms and guests
Confirm each room has the correct guests. The ★ marks the main guest.
If the reservation has multiple rooms
- Select Set Your Rooms
- Move guests into the correct rooms
- Use Change Room to move a guest later
- Select I'm Done when all guests are assigned
Change Room now keeps the guest you selected, even when that guest has no document uploaded yet. This prevents AVA from moving the wrong person in multi-room reservations.
If you reopen Change Room before check-in finishes, AVA shows Room 1, Room 2, and so on. You will still see the room type below each label.
If you use Opera OHIP, AVA keeps the room you searched as the main room card after lookup.
This stays true even when Opera normalizes the family to the main confirmation.
If Opera repeats the same nameId in another room, AVA leaves that later room's guest slot empty for staff input.
This helps even when OPERA stores guest records with different internal IDs.
If you use Cloudbeds, AVA keeps the main reservation synced after room assignment. This keeps the room card accurate when Cloudbeds splits one booking into sub-reservations.
AVA blocks moving the reservation's main guest between rooms during check-in. If you need to move the main guest, update the room assignment before check-in starts.
If you need to add missing guests
- Select Add Guest for that room
- Upload the guest's document
- Complete their guest information
If you use Opera OHIP, AVA also updates the room guest list in Opera when you save. That keeps the added guest attached to the room after check-in.
If a guest is not present
- Select Check In Later under that guest
- When they arrive, select Check In Now to resume their steps
✓ The guest is skipped and does not block the main guest
3. Upload documents
-
In the guest's Guest Verification section, select Document Upload → Upload
-
Scan the guest's passport or ID
✓ The document status switches to complete and the document number appears
Tip: If multiple guests are checking in, use Upload All Documents at the top of the page. See the section below for details.
Need to confirm which IDs are allowed? See Accepted Travel Documents.
If you see a duplicate document warning
You may see "Passport Already Uploaded" or "This passport is already registered to...".
- Select Scan Another Guest's Passport to continue scanning
- Select Go to Existing Guest to review the original guest
Using Upload All Documents for multiple guests
When checking in a group, Upload All Documents lets you scan all passports in one session before saving them.
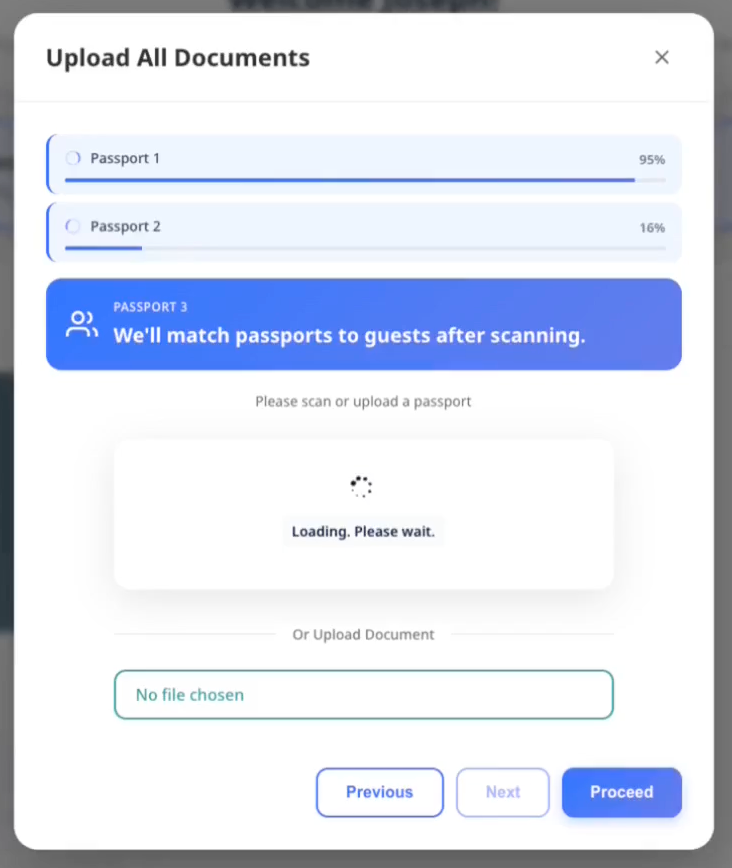
Step 1: Scan all passports
- Select Upload All Documents at the top of the room list
- Scan each guest's passport one at a time
- A progress tracker shows each passport's upload status
- If a scan fails, select Rescan passport to try again
Step 2: Review and assign
After scanning, you see a list of all passports ready to assign.
- The system suggests which guest each passport belongs to based on matching names
- If the suggestion is correct, no action is needed
- To assign a different guest, select them from the list
- To add someone new, select Create new guest
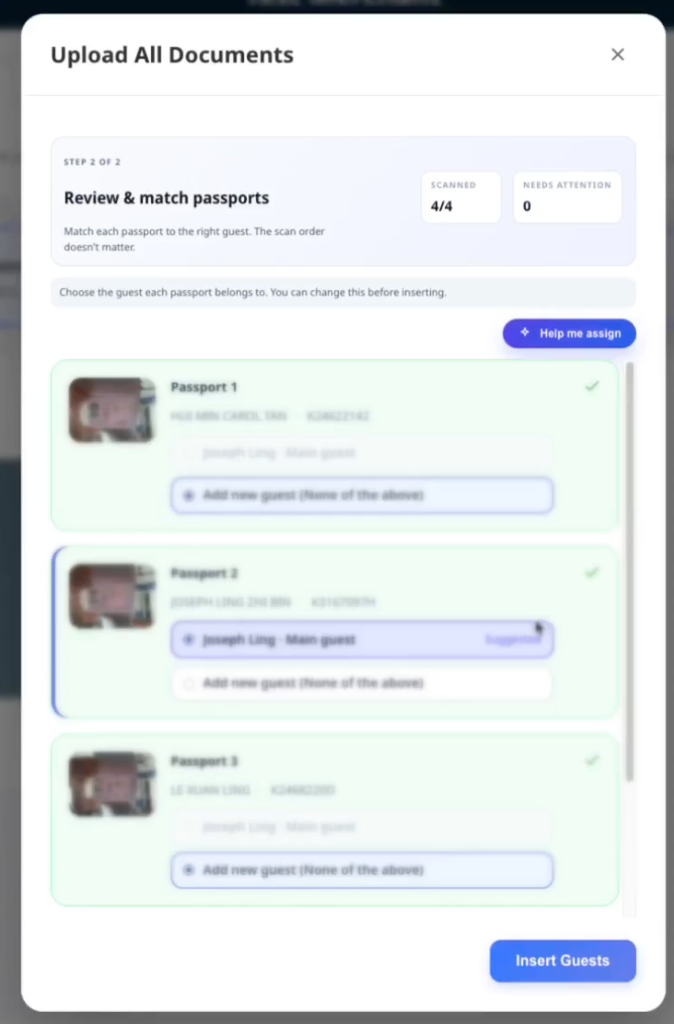
Assignment display:
- 3 or fewer guests: card-style selection buttons
- More than 3 guests: dropdown menu for compactness
Step 3: Save assignments
- Review all passport-to-guest assignments
- Select Insert Guests to save
- Any errors appear next to the affected passport
- Fix issues individually and retry if needed
Common errors:
- "Document number not detected" → rescan with better lighting
- "Already uploaded for [guest]" → assign to a different guest
- "Guest limit reached" → assign to an existing guest instead of creating new
Step 4: Verify the booking (only if a name differs)
If a scanned document's name does not match the reservation, AVA pauses on Insert Guests and shows a Verify Your Booking panel.
-
Read the prompt: "The document name differs from this reservation."
-
Check the booking email for a 4-digit verification code
-
Enter the code and select Verify Code
-
If the code does not arrive, select Resend Code (available after a short countdown)
✓ After the code is accepted, AVA saves the assignments automatically. You do not select Insert Guests again.
The Verify Your Booking panel only appears when OTP Fallback for Name Mismatch is turned on for your property. See Name Mismatch OTP Fallback.
4. Complete guest information
-
Select Guest Information → Fill
-
Confirm all fields. Required fields show a
* -
Update the Document Number if needed
-
Select Save
✓ The Guest Information step shows as complete
If the guest has no phone number, AVA uses the passport nationality for the default country code. Existing phone numbers keep their saved country code.
When guests type address or travel fields, AVA biases Google Places toward the guest's nationality. If nationality is blank, AVA falls back to the hotel country.
If you see a warning under Document Number, double-check the ID. Warnings do not block check-in.
5. Capture the signature (if required)
-
Select Signature → Sign
-
Capture the guest's signature
✓ The Signature step shows as complete
Note: By default, the main guest must sign. Some properties require all guests to sign.
6. Run facial verification (self check-in only)
If Facial Verification is visible:
-
Select Facial Verification → Verify
-
Follow the on-screen camera prompts
✓ The Facial Verification step shows as complete
Tip: Facial verification appears only in Self Check-In (CCI) mode.
Note: AVA compares the clearest face on the document first. This helps faint passport watermarks stay out of the way.
If facial verification fails
- Select Take another selfie for a clearer photo
- If it still fails, select Re-upload document and scan again
7. Collect deposit or payment (self check-in only)
If Reservation Requirements shows Deposit or Payment:
-
Select Pay
-
Complete the payment steps
✓ The payment requirement shows as complete
Note: Check-in cannot complete until all shown payments are successful.
8. Finalize the check-in
-
Select Proceed to Check-In
-
Wait for the progress screen to finish
✓ The room card shows the check-in completed state
Tip: During check-in, the system runs Checking Availability → Assigning Room → Generating Keys → Finalizing.
If this is a pre-arrival registration
- Complete all required steps above
- Select Complete Pre-Arrival instead of Proceed to Check-In
✓ The room is marked as pre-arrival completed. Room access is issued when the guest arrives.
If the room is already checked in
Select Proceed to Check-In to complete remaining guests. This does not reassign the room.
9. Provide room access
After check-in, open Room Information on the room card:
- Room Number is shown at the top
- Room Access depends on your property setup
If you use Keycards:
-
If you are in ACI, confirm the handover first.
-
Select Retrieve Keycard to encode the card now.
-
If the keycard was encoded in advance, select Already Encoded.
-
Encode each card when prompted.
-
If you need fewer cards, select Complete Check-In in the keycard modal
✓ If one encoder is online, AVA briefly shows Preparing keycard encoding... before encoding starts.
If the Win A Complimentary 1-Night Stay modal appears, close it first. Then select Complete Check-In.
If you use Smart Locks:
-
Select Show PIN
-
Share the PIN with the guest
✓ If the room access card still shows Pending or Partial success, wait for a ready status first.
If you use Lockers:
- Share the Locker Number
- Select Show Code and share the locker code
If you see a room access message instead of a code, follow the on-screen instructions.
Manage Locker Code and locker codes appear only when Settings → Room Access is set to Locker Systems. If AVA is still loading room access mode, wait and retry from the room card.
Tip: If WiFi is configured, the WiFi section shows the name and password. Room notes appear under General Information.
Room-card messages follow the guest language, even with regional codes like ko-KR.
If you are using Assisted Check-In (ACI)
After check-in, the screen shows Check-In Complete and asks the guest to return the device. If the room uses keycards, confirm the handover first. Then the keycard controls appear on the room card. Use Retrieve Keycard for new cards or Already Encoded for cards prepared in advance. In demo mode, the keycard buttons appear after handover.
Troubleshooting
Reservation not found after scan
What you see: "Reservation not found" or you are sent to the confirmation screen.
Fix:
- Enter the confirmation number instead of scanning
- Confirm the arrival date is today or yesterday
- Check the reservation is not cancelled or no-show
Multiple reservations found
What you see: "Multiple reservations found."
Fix:
- Search by confirmation number
- In Staff Access, search by reservation ID or external booking ID
Check-in button is disabled
What you see: Proceed to Check-In shows "Complete all steps."
Check:
- All guests have Document Upload complete
- Guest Information is saved for each guest
- Signature is complete for required guests
- Facial Verification is complete (Self Check-In only)
- Deposit and Payment are complete if shown
- Missing guests are marked Check In Later or added
Room not ready or too early
What you see: "Room not ready", "No rooms available", or check-in fails after Proceed to Check-In.
Fix:
- Check room status in your PMS or Room Status
- Assign a different room if allowed
- Follow your early check-in policy
If you use Opera, disallowed room conditions now use the same room-not-ready flow.
Optional offer modal blocks completion
What you see: The Win A Complimentary 1-Night Stay modal appears before Complete Check-In.
Fix:
- Close the modal
- Select Complete Check-In again
Document upload failed
What you see: "Document upload failed" or the upload stops.
Fix:
- Try scanning again with better lighting
- Select Upload Document and choose a clear photo instead
- If the issue persists, use Use Confirmation Number Instead
Bulk upload errors
What you see: Errors appear next to specific passports in Upload All Documents mode, such as:
- "Document number not detected"
- "Already uploaded for [guest name]"
- "Guest limit reached"
Fix:
- For detection errors, select Rescan passport and scan in better lighting
- For duplicates, assign the passport to a different guest
- For guest limits, select an existing guest instead of creating a new one
- If errors persist, close the modal and use individual upload for problem passports
Verification code requested during bulk upload
What you see: Selecting Insert Guests opens a Verify Your Booking panel instead of saving. This happens when a document name does not match the reservation.
Fix:
-
Open the booking email and find the 4-digit code
-
Enter the code and select Verify Code
-
If the email has not arrived, select Resend Code after the countdown ends
-
If the code keeps failing, double-check you are reading the newest email
✓ AVA saves the assignments on its own once the code is accepted.
If document names differ but no code panel shows, OTP Fallback for Name Mismatch may be off. See Name Mismatch OTP Fallback.
Facial verification keeps failing
What you see: "Facial Verification Failed" or mismatch screen.
Fix:
- Retake the selfie in brighter lighting
- Re-upload the document if the portrait is blurry
- If the guest cannot pass, follow your manual review policy
Room access not showing
What you see: No code or keycard option after check-in.
Fix:
- Refresh the room card and confirm check-in is complete
- If Room Access shows Pending or Partial success, wait for it to finish.
- Go to Settings → Room Access and confirm the active room access method
- Return to check-in and open Room Information again
- Check for a Room Access error message and follow the instructions
- If access still does not appear, contact support
Keycard controls are hidden in ACI
What you see: You do not see Retrieve Keycard or Already Encoded after check-in.
Fix:
- Confirm the staff handover first.
- Wait for the room card to refresh.
- Select Retrieve Keycard or Already Encoded once the buttons appear.
Still Stuck?
Contact success@vouch-technologies.com if:
- ❌ A reservation cannot be found after scan or confirmation number
- ❌ Check-in remains blocked after all steps are complete
- ❌ Room access does not appear after check-in
Helpful to include:
- Screenshot of the error
- Reservation confirmation number
- Guest name and arrival date
- Time the issue started