Cara Menyelesaikan Check-In
Sebagian besar check-in memakan waktu 3-5 menit saat dokumen sudah siap. Panduan ini menjelaskan pengalaman check-in tamu di kiosk self-service AVA atau perangkat assisted check-in.
Panduan ini membantu Anda memahami dan mendukung proses check-in tamu, dari pencarian reservasi hingga akses kamar. Tamu menyelesaikan check-in menggunakan kiosk check-in AVA (diakses lewat QR code atau URL) dalam tiga mode: self-service (CCI), staff-assisted (ACI), atau pre-arrival.
Cara tamu mengakses check-in:
- Memindai QR code yang ditampilkan di properti Anda
- Mengunjungi URL check-in yang Anda berikan
- Staf dapat membantu menggunakan antarmuka assisted check-in (ACI)
Untuk mengelola reservasi dan penetapan kamar dari dashboard staf, buka halaman Reservations (layar utama). Panduan ini berfokus pada pengalaman check-in yang dilihat tamu.
Video singkat ini menunjukkan seluruh alur check-in multi-room dari sudut pandang tamu.
Referensi Cepat
| Langkah | Siapa yang menyelesaikan | Muncul di mana |
|---|---|---|
| Reservation Lookup | Tamu atau staf | Check In, Reservation Lookup, atau Staff Access |
| Document Upload | Tamu atau staf | Guest Verification pada setiap kartu kamar |
| Bulk Upload | Staf (untuk grup) | Tombol Upload All Documents di atas kartu kamar |
| Guest Information | Tamu atau staf | Guest Information → Fill |
| Signature | Tamu (kadang semua tamu) | Signature → Sign |
| Facial Verification | Tamu (hanya self check-in) | Facial Verification → Verify |
| Deposit / Payment | Tamu (hanya self check-in, bila diaktifkan) | Reservation Requirements |
| Check-In / Pre-Arrival | Tamu atau staf | Proceed to Check-In atau Complete Pre-Arrival |
| Room Access | Staf atau tamu | Room Information |
Mode Check-In
| Mode | Paling cocok untuk | Yang berubah |
|---|---|---|
| Pre-Arrival | Tamu sebelum kedatangan | Tidak ada facial verification. Gunakan Complete Pre-Arrival. Akses kamar diberikan saat kedatangan. |
| Self Check-In (CCI) | Tamu di kiosk | Facial verification bisa muncul. Deposit atau payment dapat memblokir Proceed to Check-In. |
| Assisted Check-In (ACI) | Check-in yang dipandu staf | Staf memakai pencarian Staff Access. Akses kamar tetap tersembunyi sampai serah terima. |
Video singkat ini menunjukkan seluruh alur assisted check-in (ACI) dari sudut pandang staf.
Sebelum Anda Mulai
Pastikan item berikut:
- Reservasi masih aktif (tidak dibatalkan atau no-show)
- Tamu sudah menyiapkan paspor atau ID
- Kamar siap atau bisa ditetapkan
- Encoder keycard atau sistem smart lock Anda online
Check-In Langkah demi Langkah
Jika Guest Step Auto-Advance aktif, AVA membuka langkah tamu berikutnya yang diperlukan setelah Anda menyimpan. Jika nonaktif, Anda harus memilih langkah berikutnya secara manual.
1. Temukan reservasi
-
Di layar Check In, pindai paspor atau ID tamu
-
Jika pemindaian tidak tersedia, pilih Use Confirmation Number Instead
-
Masukkan nomor konfirmasi dan pilih Continue
✓ Anda seharusnya melihat kartu kamar reservasi
Pencarian scan hanya mencocokkan kedatangan dari kemarin dan hari ini. Gunakan nomor konfirmasi untuk kedatangan lebih awal atau lebih lambat.
Jika hasil scan menuju reservasi yang dibatalkan atau sudah checkout, AVA menyegarkan pencarian nama dan mencoba kecocokan aktif lagi. Jika hasil yang disegarkan masih ambigu, AVA menampilkan alur normal Multiple reservations found.
Anda juga bisa melihat Verify Your Booking setelah pencarian scan, pencarian nomor konfirmasi, atau percobaan ulang unggah dokumen Room List. Ini memakai alur verifikasi nama reservasi yang sama. Jika reservasi sudah diverifikasi, AVA mempertahankan hasil itu saat Anda mencoba lagi.
Jika Anda memakai Assisted Check-In (ACI)
- Di layar sambutan, pilih Check In
- Buka Staff Access
- Cari berdasarkan nama tamu, reservation ID, atau external booking ID
- Pilih reservasi yang benar
✓ Anda akan melihat daftar kamar
Staff Access hanya menampilkan kedatangan dari kemarin dan hari ini. Untuk mencari tanggal lain, gunakan confirmation number.
Jika tamu sudah menyelesaikan pre-arrival
Temukan reservasi dengan nomor konfirmasi, lalu lanjutkan dengan Proceed to Check-In saat tamu tiba.
2. Tinjau kamar dan tamu
Pastikan setiap kamar memiliki tamu yang benar. Tanda ★ menandai tamu utama.
Jika reservasi memiliki beberapa kamar
- Pilih Set Your Rooms
- Pindahkan tamu ke kamar yang benar
- Gunakan Change Room untuk memindahkan tamu nanti
- Pilih I'm Done saat semua tamu sudah ditetapkan
Change Room sekarang mempertahankan tamu yang Anda pilih, bahkan saat tamu itu belum mengunggah dokumen. Ini mencegah AVA memindahkan orang yang salah di reservasi multi-room.
Begitu tamu berstatus Verified, AVA menyembunyikan Change Room. Pindahkan tamu sebelum langkah verifikasi final.
Jika Anda membuka kembali Change Room sebelum check-in selesai, AVA menampilkan Room 1, Room 2, dan seterusnya. Anda tetap akan melihat tipe kamar di bawah setiap label.
Jika Anda memakai Opera OHIP, AVA mempertahankan kamar yang Anda cari sebagai kartu kamar utama setelah pencarian.
Ini tetap berlaku meski Opera menormalkan family ke konfirmasi utama.
Jika Opera mengulang nameId yang sama di kamar lain, AVA membiarkan slot tamu kamar itu kosong untuk input staf.
Ini membantu bahkan ketika OPERA menyimpan record tamu dengan ID internal yang berbeda.
Jika Anda memakai Cloudbeds, AVA menjaga reservasi utama tetap tersinkron setelah penetapan kamar. Ini membuat kartu kamar tetap akurat saat Cloudbeds memecah satu booking menjadi sub-reservasi.
Jika satu kamar dalam booking multi-room dibatalkan atau sudah checkout, AVA melewatkan kamar itu. Anda hanya melihat room card aktif setelah lookup.
AVA memblokir pemindahan tamu utama reservasi antar kamar selama check-in. Jika Anda perlu memindahkan tamu utama, perbarui penetapan kamar sebelum check-in dimulai.
Jika staf memperbarui kamar di PMS, AVA menyegarkan kamar saat ini sebelum room assignment terbuka. Anda melihat nomor kamar dan room ID terbaru, bukan record check-in yang lebih lama. Jika PMS sekarang menunjukkan tidak ada kamar, AVA menghapus kamar lokal yang usang dan mencoba lagi dengan auto-assign tanpa kamar jika pengaturan itu aktif.
Jika Anda memakai Opera OHIP, AVA mempertahankan charged room type saat menetapkan kamar fisik baru. Ini menjaga tipe kamar folio tetap stabil selama perubahan kamar.
Jika Anda perlu menambahkan tamu yang hilang
- Pilih Add Guest untuk kamar tersebut
- Unggah dokumen tamu
- Selesaikan informasi tamu mereka
Jika Anda memakai Opera OHIP, AVA juga memperbarui daftar tamu kamar di Opera saat Anda menyimpan. Ini menjaga tamu tambahan tetap terhubung ke kamar setelah check-in.
Jika ada tamu yang belum hadir
- Pilih Check In Later di bawah tamu itu
- Saat mereka datang, pilih Check In Now untuk melanjutkan langkah mereka
✓ Tamu dilewati dan tidak menghalangi tamu utama
3. Unggah dokumen
-
Di bagian Guest Verification tamu, pilih Document Upload → Upload
-
Pindai paspor atau ID tamu
✓ Status dokumen berubah menjadi complete dan nomor dokumen muncul
Jika update jumlah tamu PMS gagal, AVA tetap menyimpan dokumen yang diunggah. Ini juga berlaku saat Anda menyimpan dokumen staged. Anda tidak perlu memindai dokumen lagi.
Tip: Jika beberapa tamu sedang check-in, gunakan Upload All Documents di bagian atas halaman. Lihat bagian di bawah untuk detail.
Jika tamu berganti antara kamera depan dan belakang, AVA memperbarui panduan scan secara otomatis. Ini menjaga instruksi di layar sesuai dengan kamera yang aktif.
Perlu memastikan ID mana yang diperbolehkan? Lihat Accepted Travel Documents.
Jika Anda melihat peringatan dokumen duplikat
Anda mungkin melihat "Passport Already Uploaded" atau "This passport is already registered to...".
- Pilih Scan Another Guest's Passport untuk melanjutkan pemindaian
- Pilih Go to Existing Guest untuk meninjau tamu asli
Menggunakan Upload All Documents untuk beberapa tamu
Saat check-in grup, Upload All Documents memungkinkan Anda memindai semua paspor dalam satu sesi sebelum menyimpannya.
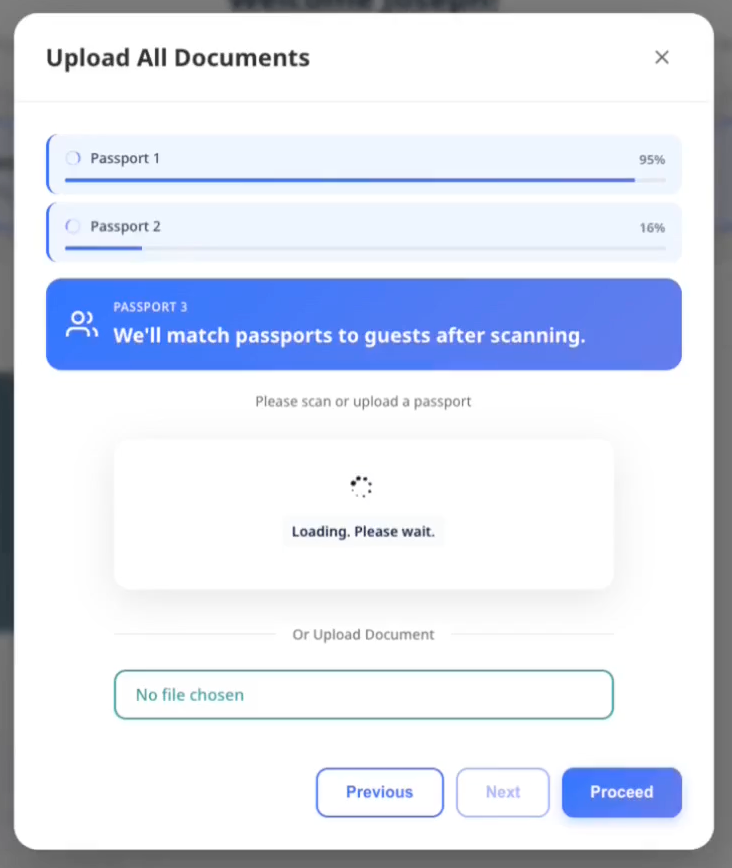
Langkah 1: Pindai semua paspor
- Pilih Upload All Documents di bagian atas daftar kamar
- Pindai setiap paspor tamu satu per satu
- Tracker progres menunjukkan status upload setiap paspor
- Jika pemindaian gagal, pilih Rescan passport untuk mencoba lagi
Langkah 2: Tinjau dan tetapkan
Setelah pemindaian, Anda melihat daftar semua paspor yang siap ditetapkan.
- Sistem menyarankan paspor milik tamu yang mana berdasarkan kecocokan nama
- Jika saran sudah benar, tidak perlu tindakan
- Untuk menetapkan ke tamu lain, pilih tamu dari daftar
- Untuk menambahkan orang baru, pilih Create new guest
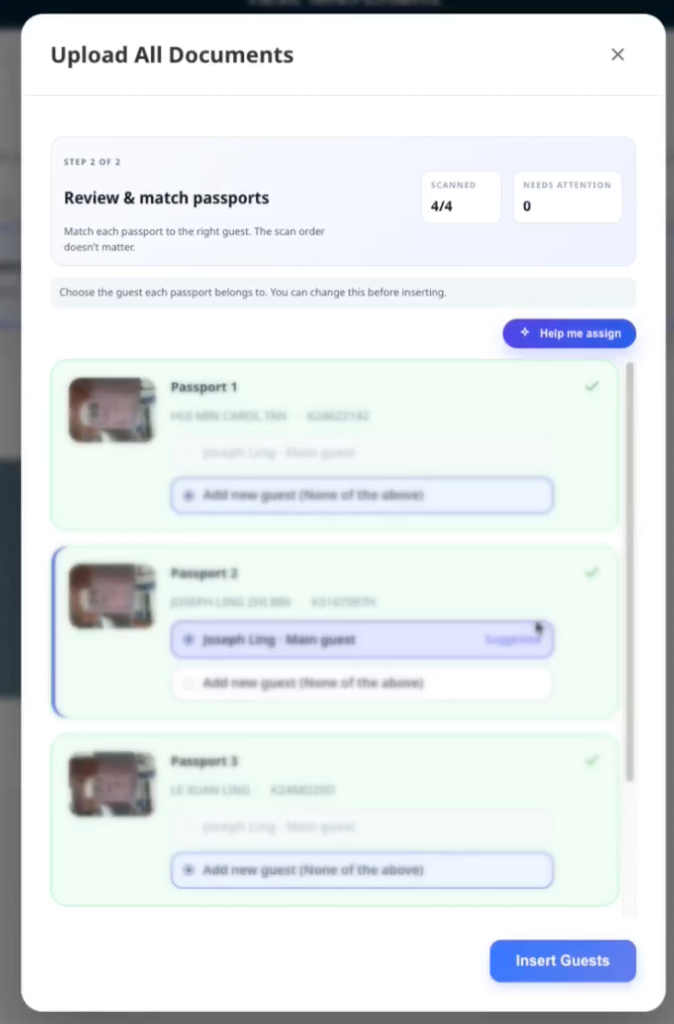
Tampilan penetapan:
- 3 tamu atau kurang: tombol seleksi berbentuk kartu
- Lebih dari 3 tamu: menu dropdown agar ringkas
Langkah 3: Simpan penetapan
- Tinjau semua penetapan paspor ke tamu
- Pilih Insert Guests untuk menyimpan
- Jika ada error, error muncul di samping paspor yang terdampak
- Perbaiki satu per satu dan coba lagi jika perlu
Error umum:
- "Document number not detected" -> pindai ulang dengan pencahayaan lebih baik
- "Already uploaded for [guest]" -> tetapkan ke tamu lain
- "Guest limit reached" -> tetapkan ke tamu yang sudah ada, bukan membuat baru
Langkah 4: Verifikasi booking (hanya jika nama berbeda)
Jika nama pada dokumen yang dipindai tidak cocok dengan reservasi, AVA berhenti di Insert Guests dan menampilkan panel Verify Your Booking.
-
Baca prompt: "The document name differs from this reservation."
-
Periksa email booking untuk 4-digit verification code
-
Masukkan kode dan pilih Verify Code
-
Jika kode tidak datang, pilih Resend Code (tersedia setelah hitung mundur singkat)
✓ Setelah kode diterima, AVA menyimpan penetapan secara otomatis. Anda tidak memilih Insert Guests lagi.
Panel Verify Your Booking muncul saat AVA butuh konfirmasi booking tambahan. Lihat Booking Name Verification for Partial Matches dan Name Mismatch OTP Fallback.
4. Lengkapi informasi tamu
-
Pilih Guest Information → Fill
-
Pastikan semua field terisi. Field wajib menampilkan
* -
Perbarui Document Number jika perlu
-
Pilih Save
✓ Langkah Guest Information ditandai selesai
Jika tamu tidak memiliki nomor telepon, AVA memakai nasionalitas paspor sebagai kode negara default. Nomor telepon yang sudah ada tetap mempertahankan kode negara yang tersimpan.
Saat tamu mengetik field alamat atau travel, AVA mengarahkan Google Places ke nasionalitas tamu. Jika nasionalitas kosong, AVA kembali ke negara hotel.
Jika Anda melihat peringatan di bawah Document Number, periksa kembali ID tersebut. Peringatan tidak memblokir check-in.
Jika penyimpanan informasi tamu gagal
Yang Anda lihat: Kartu Guest Information menampilkan error state setelah Anda memilih Save.
Perbaikan:
-
Periksa field wajib dan koreksi nilai yang tidak valid.
-
Buka lagi Guest Information → Fill.
-
Pilih Save.
-
Jika error kembali, refresh halaman dan coba sekali lagi.
✓ Kartu harus kembali ke state tersimpan setelah retry berhasil.
5. Ambil tanda tangan (jika diperlukan)
-
Pilih Signature → Sign
-
Ambil tanda tangan tamu
✓ Langkah Signature ditandai selesai
Catatan: Secara default, tamu utama harus menandatangani. Beberapa properti mewajibkan semua tamu menandatangani.
6. Jalankan verifikasi wajah (hanya self check-in)
Jika Facial Verification terlihat:
-
Pilih Facial Verification → Verify
-
Ikuti prompt kamera di layar
✓ Langkah Facial Verification ditandai selesai
Tip: Facial verification hanya muncul di mode Self Check-In (CCI).
Catatan: AVA membandingkan wajah yang paling jelas di dokumen terlebih dahulu. Ini membantu watermark paspor yang samar agar tidak mengganggu.
Jika verifikasi wajah gagal
- Pilih Take another selfie untuk foto yang lebih jelas
- Jika masih gagal, pilih Re-upload document dan pindai lagi
7. Ambil deposit atau pembayaran (hanya self check-in)
Jika Reservation Requirements menampilkan Deposit atau Payment:
-
Pilih Pay
-
Selesaikan langkah pembayaran
✓ Persyaratan pembayaran ditandai selesai
Catatan: Check-in tidak bisa selesai sampai semua pembayaran yang ditampilkan berhasil.
8. Selesaikan check-in
-
Pilih Proceed to Check-In
-
Tunggu sampai layar progres selesai
✓ Room card menampilkan status check-in selesai
Tip: Selama check-in, sistem menjalankan Checking Availability → Assigning Room → Generating Keys → Finalizing.
Jika ini pre-arrival registration
- Selesaikan semua langkah wajib di atas
- Pilih Complete Pre-Arrival alih-alih Proceed to Check-In
✓ Kamar ditandai sebagai pre-arrival completed. Akses kamar diberikan saat tamu tiba.
Jika kamar sudah check-in
Pilih Proceed to Check-In untuk menyelesaikan tamu yang tersisa. Ini tidak menetapkan ulang kamar.
9. Berikan akses kamar
Setelah check-in, buka Room Information pada room card:
- Room Number ditampilkan di bagian atas
- Room Access bergantung pada setup properti Anda
Jika Anda memakai Keycards:
-
Jika Anda berada di ACI, konfirmasikan serah terima terlebih dahulu.
-
Pilih Retrieve Keycard untuk meng-encode kartu sekarang.
-
Jika keycard sudah di-encode sebelumnya, pilih Already Encoded.
-
Encode setiap kartu saat diminta.
-
Jika Anda memerlukan lebih sedikit kartu, pilih Complete Check-In di modal keycard
✓ Jika satu encoder online, AVA sebentar menampilkan Preparing keycard encoding... sebelum encoding dimulai.
Jika modal Win A Complimentary 1-Night Stay muncul, tutup dulu. Lalu pilih Complete Check-In.
Jika Anda memakai Smart Locks:
-
Pilih Show PIN
-
Bagikan PIN kepada tamu
✓ Jika kartu room access masih menampilkan Pending atau Partial success, tunggu status ready terlebih dahulu.
Jika Anda memakai Lockers:
- Bagikan Locker Number
- Pilih Show Code dan bagikan kode locker
Jika Anda melihat pesan room access alih-alih kode, ikuti instruksi di layar.
Manage Locker Code dan kode locker hanya muncul ketika Settings → Room Access disetel ke Locker Systems. Jika AVA masih memuat mode room access, tunggu lalu coba lagi dari room card.
Tip: Jika WiFi dikonfigurasi, bagian WiFi menampilkan nama dan password. Catatan kamar muncul di bawah General Information.
Pesan room-card mengikuti bahasa tamu, bahkan dengan kode regional seperti ko-KR.
Jika Anda memakai Assisted Check-In (ACI)
Setelah check-in, layar menampilkan Check-In Complete dan meminta tamu mengembalikan perangkat. Jika kamar memakai keycard, konfirmasikan serah terima terlebih dahulu. Lalu kontrol keycard muncul di room card. Gunakan Retrieve Keycard untuk kartu baru atau Already Encoded untuk kartu yang sudah disiapkan sebelumnya. Dalam demo mode, tombol keycard muncul setelah serah terima.
Pemecahan Masalah
Reservasi tidak ditemukan setelah scan
Yang Anda lihat: "Reservation not found" atau Anda diarahkan ke layar konfirmasi.
Jika kecocokan pertama tidak aktif, AVA menyegarkan lookup nama dan mencoba booking aktif lagi. Anda mungkin melihat booking pengganti tanpa perlu mencari lagi.
Perbaikan:
- Masukkan confirmation number alih-alih memindai
- Konfirmasi arrival date adalah hari ini atau kemarin
- Periksa reservasi tidak dibatalkan atau no-show
Beberapa reservasi ditemukan
Yang Anda lihat: "Multiple reservations found."
Perbaikan:
- Cari dengan confirmation number
- Di Staff Access, cari dengan reservation ID atau external booking ID
Tombol check-in dinonaktifkan
Yang Anda lihat: Proceed to Check-In menampilkan "Complete all steps."
Periksa:
- Semua tamu telah menyelesaikan Document Upload
- Guest Information tersimpan untuk setiap tamu
- Signature selesai untuk tamu yang diwajibkan
- Facial Verification selesai (hanya Self Check-In)
- Deposit dan Payment selesai jika ditampilkan
- Tamu yang belum hadir ditandai Check In Later atau sudah ditambahkan
Kamar belum siap atau terlalu awal
Yang Anda lihat: "Room not ready", "No rooms available", atau check-in gagal setelah Proceed to Check-In.
Perbaikan:
- Periksa status kamar di PMS atau Room Status
- Tetapkan kamar lain jika diperbolehkan
- Pilih Continue registration jika tamu masih perlu menyelesaikan kamar lain
- Pilih End session jika Anda ingin menghentikan check-in saat ini
- Ikuti kebijakan early check-in Anda
Saat Anda memilih Continue registration, AVA menjaga tamu multi-room tetap di alur Room List saat ini. Anda bisa menyelesaikan sisa kamar tanpa mengirim semua orang kembali ke layar utama.
End session memakai perilaku keluar kiosk yang sama seperti bilah atas. Itu menutup sesi saat ini dan mengembalikan tamu ke layar mulai kiosk.
Jika Anda memakai Opera, kondisi kamar yang tidak diizinkan sekarang memakai alur room-not-ready yang sama.
Jika tidak ada kamar tersedia setelah waktu check-in, AVA mengantre reservasi dan mengirim email room-not-ready. Email room-ready tetap dikirim nanti.
Modal penawaran opsional menghalangi penyelesaian
Yang Anda lihat: Modal Win A Complimentary 1-Night Stay muncul sebelum Complete Check-In.
Perbaikan:
- Tutup modal
- Pilih Complete Check-In lagi
Upload dokumen gagal
Yang Anda lihat: "Document upload failed" atau upload berhenti.
Perbaikan:
- Coba scan lagi dengan pencahayaan yang lebih baik
- Pilih Upload Document dan pilih foto yang jelas sebagai gantinya
- Jika masalah berlanjut, gunakan Use Confirmation Number Instead
Bagian ini hanya berlaku saat dokumen tidak tersimpan. Jika dokumen sudah tersimpan dan hanya sinkron jumlah tamu PMS yang gagal, AVA tetap menyimpan upload. Periksa reservasi nanti jika jumlah tamu masih tampak berbeda di PMS Anda.
Error bulk upload
Yang Anda lihat: Error muncul di samping paspor tertentu di mode Upload All Documents, seperti:
- "Document number not detected"
- "Already uploaded for [guest name]"
- "Guest limit reached"
Perbaikan:
- Untuk error deteksi, pilih Rescan passport dan scan dengan pencahayaan lebih baik
- Untuk duplikat, tetapkan paspor ke tamu lain
- Untuk batas tamu, pilih tamu yang sudah ada alih-alih membuat baru
- Jika error tetap ada, tutup modal dan gunakan upload individual untuk paspor bermasalah
Kode verifikasi diminta selama bulk upload
Yang Anda lihat: Memilih Insert Guests membuka panel Verify Your Booking alih-alih menyimpan. Ini terjadi saat AVA menemukan mismatch nama yang borderline.
Perbaikan:
-
Buka email booking dan temukan 4-digit code
-
Masukkan kode dan pilih Verify Code
-
Jika email belum datang, pilih Resend Code setelah hitung mundur selesai
-
Jika kode terus gagal, periksa lagi bahwa Anda membaca email terbaru
✓ AVA menyimpan penetapan dengan sendirinya setelah kode diterima.
Jika nama dokumen berbeda tetapi panel verifikasi tidak muncul, kecocokan nama mungkin terlalu lemah untuk fallback ini. OTP Fallback for Name Mismatch atau booking name verification for partial matches mungkin juga mati. Lihat Document Checks.
Facial verification terus gagal
Yang Anda lihat: "Facial Verification Failed" atau layar mismatch.
Perbaikan:
- Ulangi selfie dengan pencahayaan yang lebih terang
- Unggah ulang dokumen jika foto wajah buram
- Jika tamu tetap tidak lolos, ikuti kebijakan manual review Anda
Akses kamar tidak muncul
Yang Anda lihat: Tidak ada opsi kode atau keycard setelah check-in.
Perbaikan:
- Muat ulang room card dan pastikan check-in selesai
- Jika Room Access menampilkan Pending atau Partial success, tunggu sampai selesai.
- Buka Settings → Room Access dan pastikan metode room access aktif yang benar
- Kembali ke check-in dan buka Room Information lagi
- Periksa pesan error Room Access dan ikuti instruksinya
- Jika akses masih tidak muncul, hubungi support
Kontrol keycard tersembunyi di ACI
Yang Anda lihat: Anda tidak melihat Retrieve Keycard atau Already Encoded setelah check-in.
Perbaikan:
- Konfirmasikan serah terima staf terlebih dahulu.
- Tunggu room card memuat ulang.
- Pilih Retrieve Keycard atau Already Encoded setelah tombol muncul.
Masih Terkendala?
Hubungi success@vouch-technologies.com jika:
- ❌ Reservasi tidak dapat ditemukan setelah scan atau confirmation number
- ❌ Check-in tetap terblokir setelah semua langkah selesai
- ❌ Room access tidak muncul setelah check-in
Informasi yang sebaiknya disertakan:
- Screenshot error
- Reservation confirmation number
- Nama tamu dan arrival date
- Waktu masalah mulai terjadi